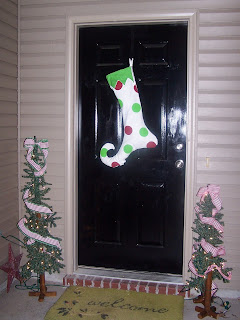
So wanna know how to make your own?
I knew I wanted mine to hang on the door, so I used a heavyweight duck cloth, which I got at Wal-Mart. You can get it almost anywhere. I was semi inspired by the ones from Ballard Designs.
Aren't they cute? BUT, I wasn't crazy about the shape. They kind of look like when you have on sweaty crew socks or something after a workout and you pull them off by the toe and they get that weird pointy stretched out thing going on. I wanted something a bit more whimsical. Not even to mention that mine was not $25.00. It was more like $8.00. That's MUCH more to my liking.
So, like I said, I chose white duck cloth. I washed, dried and ironed it. Then I got a large piece of craft paper and drew out my pattern and cut it out. Then I doubled my fabric, laid my pattern on top
and cut out two stocking pieces at once.
I decided that I wanted a "crown" part for the top so again, I drew out a pattern, making sure the top of the stocking and the crown were the same size. I had just a little bit of the green dot I wanted to use for the crown foldover,
so I opted to use some lightweight cotton for the back and inside of the "crown" part. So, I cut on green piece and three white pieces for my crown.
Obviously, if you have plenty of fabric for the crown, you can cut four pieces of the same fabric. Pin the right sides of your crown fabric together.
Stitch, using 1/4" seam allowance down the sides and up and down the points. See the silly pictures below where I drew in the black stitches. Yes, I'm a dork.
Anyway, clip your seam allowances in the corners of your crown points, being careful not to actually clip the stitches.
Now flip your crown pieces inside out and iron flat. You should have two crown pieces now. Pin together, right sides together and stitch down the sides.
Can you see my stitches? Stitch down the sides were it's pinned. Put your crown aside and pin your stocking pieces together and stitch all around except for the top. Clip carefully around the toe. Turn inside out and iron. So sorry I forgot to take pictures of this step. ***This is the time to add a hanging loop if you want one. I fogot to do this step. DUH! If you do this, take a piece of ribbon and double it. Line up the edges with the top of your stocking, with the loop part down in the stocking and stitch in place so it will be in between the inside of the stocking and the crown piece you are about to sew.
Now, get your crown piece, right side out, points down, and slip inside of your stocking, doing your best to line up the side seams of the crown with the side seams of the stocking.
Pin in place.
Stitch all the way around the opening using 1/4" seam allowance.
Now, flip your crown to the outside of your stocking and iron in place.
So, of course I wanted polka dots. I had planned on ding applique dots, but didn't have the fabric I wanted to do it. Being the impatient person that I am, I decided to go ahead and just paint on my dots. I just used acrylic craft paint. After it was dry, I WAS going to stuff the toe with polyfil so it didn't flop around, but because my daughter used it all on her latest sock monkey project, I opted to use papertowels and washcloths. Weird, right? Like I said before, I am impatient and didn't have time to run to Wal-Mart.
Wow. My rug looks AWFUL. Oh well. I still love my stocking.
I'm linking this project to the following blog parties:
Hookin' Up With House of Hepworths
Strut You Stuff @ Somewhat Simple
Chic & Crafty Party @ The Frugal Girls
Weekend Bloggy Reading @ Serenity Now for Amanda.
The Doors and Porches Party @ At The Picket Fence


Your stocking is adorable! I love the shape. Great tutorial.
ReplyDeleteThis is unique and adorable. I love how it looks on your front door.
ReplyDeleteI love yours - it is SO CUTE! I just wish I could sew! HA! Yours is SO MUCH better than Ballard Designs any day of the week! Great job Tanya! :)
ReplyDeleteLOVE it!! May have to make one for myself - my stocking is a little too plain.
ReplyDeleteYou did such a GREAT job!!!
ReplyDeleteSo cute and whimsical! I love the revised shape. I also love all your 'revisions' to your plans. I'm impatient too and love to find out about shortcuts and improvisions.
ReplyDeleteThat is adorable! Thank you for the tutorial. I need to try this.
ReplyDeleteThat is, by far, the cutest stocking I have ever seen! Girl...you amaze me!
ReplyDeleteI love your big ole stocking! It looks so fantastic and I'm so glad you shared it with us at the Doors and Porches party!
ReplyDeleteVanessa